Monday, March 31, 2014

Plug-in Review: qp Grade Assistant 2

So we gave in....... and decided to review the occasional software, gear, and training package. This will not be turning into a "camera and software" review blog however.

While the internet is full of reviews for video gear, software, and training, we will be reviewing different, often unheard of products that will hopefully grab your interest and deserve your support. I occasionally feel a product deserves special mention on our blog if it changes the way we approach a certain aspect of storytelling, if it's use in our work substantially improves our workflow, or if it simply an outstanding product (officially awarded "Cinetic Awesomeness").

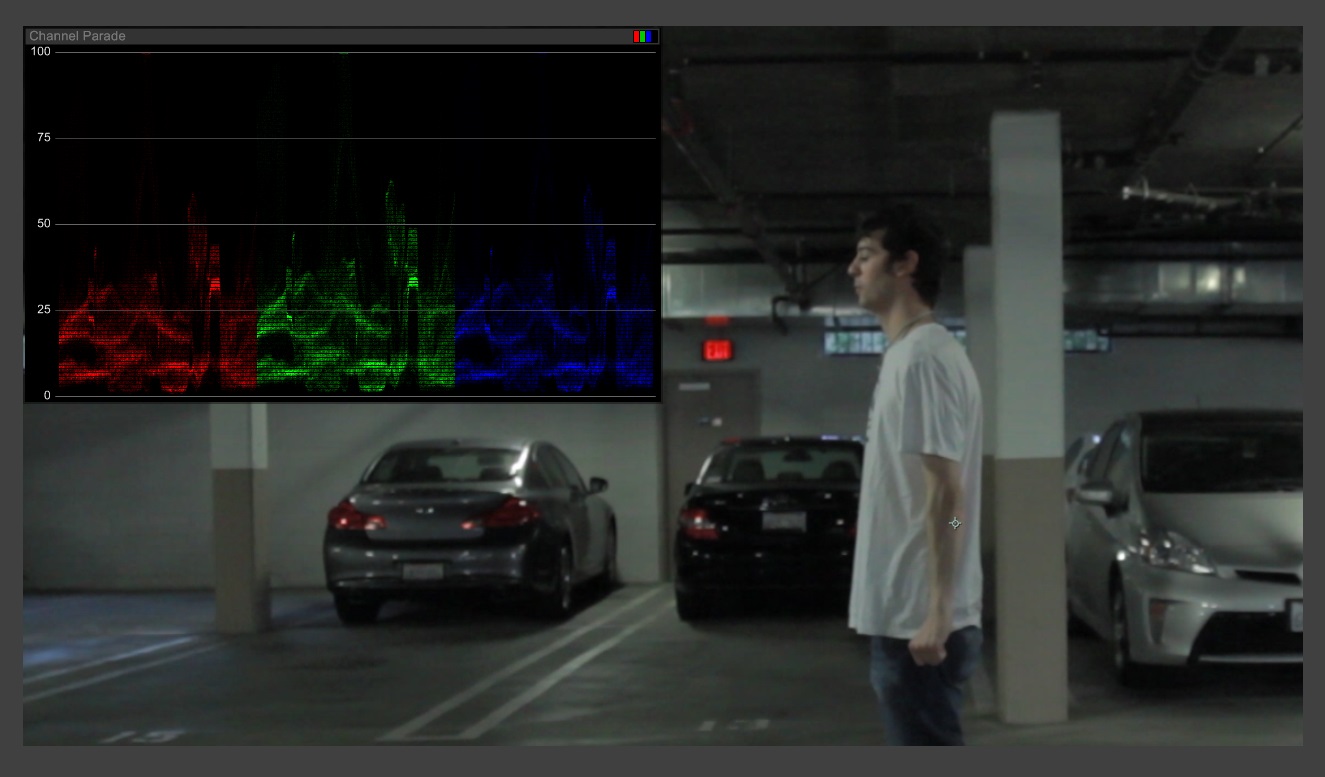
As I've been testing out a new After Effects plug-in on our newest video, I discovered it offered some really great tools that were unavailable with an built-in After Effects plug-ins or features. qp Grade Assistant 2 , available at AEScripts, offers you every type of scope you could ever want right inside After Effects: Lumascope, Vectorscopes, RGB scopes, and few more useful features that can really help you grade or composite your images with more accuracy besides "that looks better".

All Scopes and RGB Channels
Now, why would you want scopes in After Effects? We have them in our editor & color grading applications, so why add another? Plenty of reasons! After Effects has some extremely powerful controls for color correction and grading (even better than Premiere Pro CC and Final Cut X\Pro), it can be used as for finishing due to its powerful text and design tools, and we can't forget about the massive collection of third-part plug-in available which add untold levels of functionality. Add in the tracking potential from Mocha and 3D Camera Trackers and After Effects is easily the be most useful post production application around with scopes. OKAY, even without scopes, After Effects earns that title, but adding scopes really gives it a set of legs with ANY use involving color manipulation.
RGB Scopes
Besides the basic addition of a variety of scopes, this plug-in adds two neat features called Comp Assist and Grade Assist.

Comp Assist aids in the compositing (or combining multiple images into one) by displays the red, green and blue channels individually so you can the correct the colors to match (see my sample below). This makes compositing, say for example, a green screen key to a background much easier, as its essentially the act of matching 3 different black and white images using a basic levels of curves effects in After Effects on each of the Red, Green, and Blue channels. It's all messing around with each color channel until it looks just about right, or hitting reset on the effect and trying again, but eventually I'm betting you'll nail it, especially if you have some help like this plug-in.
Comp Assist of the Right
Comp Assist of Green Screen


Grade Assist aids by giving you live, responsive scopes while you grade with a huge number of effects loaded up (within reason and depending on your system configuration). That simple, but extremely useful, as its completely missing from After Effects and unavailable outside of Color Finesse, which is still a paid third party plug-in. Whether you like to use levels, curves, or third party plug-ins like FilmConvert to work with color, I found qb Grade Assistant 2 to be an extremely useful addition to After Effects if you need to manipulate color accurately in Adobe After Effects.

Final Decision: I found the qb Grade Assistant 2 quite useful and would definitely recommend it, especially if you do a lot of color correcting\grading or chroma keying in After Effects. It's not an absolute necessity at $79.99, but it really did make the process easier especially with the scopes and two useful 'assist' features. Be sure to check out the plug-in at http://aescripts.com/qp-grade-assistant/where you can try it or purchase it, if it sounds interesting. 
Disclaimer: I am a beta tester for this plug-in and was provided a license for testing and evaluation purposes. This fact does not factor into my review or opinion whatsoever. I won't support software or gear simply because a company offers to pay or provide free product in exchange for a positive review. Period.

Friday, March 7, 2014

Slow and Wells Wins the Race


I have the patience of a 2 year old and when it comes to learning new things and I can get frustrated when I cannot accomplish a new task instantly. Well, after I am over my fit and ready to put the project aside I remember what my prior boss once told me, “It is always better to learn something slow and well rather than fast and poor.”  This golden nugget has stuck with me since and has been the key to what we are doing here at Cinetic Studios.

Most of our shorts now are shot on multiple cameras and have significant post production work.  If you asked us to do that a year ago, our team would laugh and think you were crazy. A year has gone by and we have all been learning “slow and well” so that we can develop good and successful habits.  Practicing our solid, trained skills will eventually lead us to be faster at what we do.  So when we are sitting in our office cursing out the computer, we like to remind ourselves that “slow and well” always wins over “fast and bad”.

-Posted by Jessica

Friday, February 7, 2014

My Good Friend, The Glidecam (Part I)

In the last decade, the ticket of entry into the world of independent filmmaking was demolished as high quality cameras and equipment became available to any high school student with an imagination, a story to tell, and a few hundred dollars. It was a glorious time to be fascinated by filmmaking; it was filled with light sabers, crappy green screens, boom mics on brooms, and makeshift Steadicams made out of tripods weighted with duct tape rolls. These great memories can be found on our YouTube channel.


As cheap cameras started recording higher quality video while getting smaller and lighter (to the point where they can be built into our cell phones), we gain one huge downside: unintended camera shake. The unintended camera shake started as a physical downside to an evolution in video technology; as electronics get smaller and lighter, its harder to hold them steady. One solution to this problem is quite simple: add more weight.

Well, if it were that simple, there wouldn't be an entire industry dedicated to camera stabilization. Stabilization for a little DSLR camera is about adding weight to bulk it back up.  Adding weight allows us to treat it like a heavy "cinema" camera. For a Glidecam\Stedicam Merlin style device, I learned it was about precisely countering the weight if you wanted a "floaty" style feel rather than just adding weight.

In case you are making the transition from the classic DIY glidecam to a Glidecam 2000/4000, I would recommend the following video to learn how to balance your new good friend.


In Part II of "My Good Friend, The Glidecam", I will give you a list of tips I have learned from my last year with my good friend.

-Posted by Jason

Wednesday, January 8, 2014

Producers

In 2012 Jason and I took a tour of the Warner Bros. public lot. During the tour we got to see stages, props, actors, warehouses and everything in between. Our tour guide told us many "lot stories" including one of studio producers. In sitcoms producers come in, listen to a story, tell the writers to fix it, arrange for advertising sponsors, tell the show runners they needed to fix things again and repeat. Listening to our tour guide I thought that these "producer people" were kind of bossy and obnoxious.

Fast forward to 2013 when Jessica steps into her own shoes of a producer. I would not say I asked to be a producer, but it just happened.

Time and time again Jason thinks of an idea for a video, writes it down, mulls it over and finally is ready to bring it to me to discuss. He reads me his idea and I tell him what to change or how we need to scrap the whole thing (Sorry, Jason). 

When we are shooting the video I come in and oversee how everything is going. I make sure our crew gets breaks and has food and drinks. I constantly tell Jason that something is in his shot or point something out that he does not hear or realize. I am Captain Jason's First Mate.

After production, Jason edits the video and I step in to watch it and tell him how I think it should be reworked to include shots he forgot he even had. He plays it for me again after he gets lost in the edit room and I give him another list of changes. Step and repeat.

Once the video is uploaded it is my job to post it to our Twitter, Facebook and Blog to get our viewers to watch it for the very first, and hopefully many more, times.

Looking back I realize that "producer people" are not bossy or obnoxious; instead they are people who facilitate getting a product from point A to Z in an efficient and effective way. Producers have to have a certain skillset to be able to think of all of the possible issues that may even slightly arise. And more than anything, producers have to be great managers who are strong and assertive.

-Posted by Jessica

Wednesday, January 1, 2014

Technical Breakdown: Zipped

We released "Zipped" as our official entry into Bloody Cut Films' BCHorrorChallenge a couple of days ago. The short is about the battle between sanity and psychosis after being kidnapped and left alone.


This short is definitely our best to date and we are very happy and excited to share it with all of you. Now for the good stuff. Here is our technical breakdown:

Production: Rigs, Cameras & Lenses
This short was shot on our Canon T3i with a Tokina 11-16mm F2.8, Canon T2i with a Tamron 17-50mm F2.8, & a GoPro Black using various mounts (although none of the GoPro footage was ultimately used in the final edit). Ninety percent of the garage shots are completely handheld and rigless, while the other ten percent were shot on a tripod. The outside scenes were shot using a Glidecam. 

We shot with both cameras set wide open at F2.8 to let in as much light as possible and ISO was set between 800 and 1250. Both Canon cameras were tuned to Prolost Flat picture styles. Originally, I intended to use the Flaat picture profile since we shot everything in very low light.

Unfortunately, I was rushing on set and did not double check equipment before we started rolling. Luckily, I had both cameras already set in Prolost as a habit. Since this short was going to be highly stylized in post, this could have been a huge problem if the cameras were set to different picture profiles; this would have resulted in numerous additional hours of color correcting.

Post Production: Edit & Sound Design
This was my second project working on Adobe Premiere CC, and it was a decently smooth experience. Sound Design was first done in Premiere, and then moved to Adobe Audition for sweetening. While I wanted to color in DaVinci Resolve, I simply did not have enough time so it was colored & graded in Premiere using a combination of the Colorista, Filmconvert, LUTs, and Lumetri plug-ins layered together.

Here are some of our before and afters for the color correction/grade:


The biggest challenge for me as an editor on this project was the rapid cutting and the sound mixing. Since I am not a huge horror fanatic, this was an extremely fun, educational and experimental short. To start, I watched a bunch of horror shorts on Vimeo and took note of themes in sound design and editing I liked. I used the popular television show, "American Horror Story", as a reference to how I wanted our short to feel and sound. My goal for the short was to making it feel and look weird, strange and creepy. 

Even after filming the short, it really did not come alive until I went crazy with the sound mixing. Little aspects like warping the fog machine sound, adding the zip tie sound effect at ten percent and increasing the volume of the music as the short progresses all subconsciously guided viewers towards the finale.

Just for fun, here is our finished timeline:


We hope you enjoyed "Zipped". We are currently working on the Behind The Motion for YouTube so stayed tuned for scenes that ended up on the "cutting room floor".

-Posted by Jason